With my first child, I was prepared for pregnancy to be uncomfortable at times. I expected labor and delivery to be intense. I figured I’d be emotional after having a baby. What I didn’t expect (or really prepare for) is that breastfeeding can be difficult the first few days as well!

Don’t get me wrong. It is worth it. The pain isn’t that bad and a lot can be helped by making sure baby has a good latch from the very beginning. However, this certainly didn’t make it completely painless for me as many claim. Instead, I found that for the first week or so of nursing a baby, I had to take a deep breath and mentally prepare because it was quite uncomfortable.
Perhaps you can empathize if you’ve also breastfed a baby. And my apologies to anyone who hasn’t yet but plans to, I wish someone had warned me!
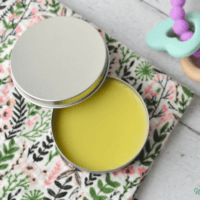
Nipple Cream
A few days after I had my first baby when I was in the trenches of learning to breastfeed, the lactation consultant suggested lanolin cream. I tried it and proceeded to get much, much worse. Turns out I was allergic to lanolin!
Needless to say, I didn’t use it again after that. It did make me wonder though if there was something I could use that might offer some relief.
Why Not Lanolin?
For me, the answer was because I was allergic. As I started researching to make my own homemade nipple balm cream recipe, I realized lanolin wasn’t an ingredient I wanted to use, even if I could without a reaction.
What is Lanolin?
Lanolin is an oil from sheep’s wool. The sebum (oil) is extracted from the wool and it undergoes another process to create the finished lanolin. This is obviously problematic for anyone allergic to wool (raises hand). There are also concerns about pesticide residue found in wool and the potential for this to build up in fatty tissue or in breast milk.
Many sheep are sprayed with pesticides to treat various mites and pests. Additionally, most sheep are fed non-organic and GMO feed, and traces of this can be found in the wool as well. There are some sources of organic lanolin from healthy sheep, but it’s hard to find.
Sources disagree about the safety of lanolin and some claim it’s perfectly safe. It wasn’t a risk I wanted to take with my newborn babies just in case. Most popular brands of nipple cream have concentrated lanolin. While these may help mom heal more quickly, they also become part of little ones’ first food and more natural skincare options can be effective as well.
A Natural Nipple Cream
I was determined to have an easier time with those first days of nursing with my last two babies. I started experimenting with making a natural nipple cream or nursing balm that would help ease the discomfort of sore nipples. It’s also important to check for oral ties and other things that can affect a baby’s latch!
There are some really good pre-made nipple creams and salves available now if you don’t feel like making a DIY version. I still opted to make my own nipple cream for breastfeeding since I had the supplies on hand. If you want to buy one, here are some good brands:
Choosing Safe Ingredients
Since this cream is essentially ingested by a nursing baby, I made sure to use ingredients that are safe, natural, and have a low chance of allergic reaction. For this reason, I decided not to use almond oil, beeswax, or coconut oil. As much as I love these ingredients they have a small chance of an allergic reaction.
I also didn’t use any essential oils in this recipe. While they’re great for skin care (when used properly), I never gave them to my babies internally.
Nipple Cream Ingredients
Instead of using any ingredients that could cause an allergic reaction or be harmful, I used the following:
- Olive Oil– the main ingredient in both store-bought natural options I found and considered a safe, food-grade oil. (I just made sure I got it from a good source)
- Cocoa Butter– Another food-safe ingredient (I use it to make chocolate) that helps thicken the balm and protect the skin. Shea butter or mango butter are also good options.
- Calendula Flowers– Soothing to skin, anti-inflammatory, and helps speed healing of irritated skin.
- Chamomile Flowers– Also soothing to skin as well as calming and relaxing.
- Marshmallow Root– Cooling, soothing and slippery. This helped offer relief to sore and red skin. It’s also a key ingredient in the Motherlove Nipple Balm.
A Note on Consistency
This nipple cream is a slightly softer salve and I found it easier to apply that way. If you want it firmer, then increase the cocoa butter to 1/3 cup (or more). You could add some beeswax to thicken, but there is a rare chance baby could have an allergic reaction.
There is some evidence though that the pesticides in inorganic beeswax could be to blame for beeswax allergies. While I always use organic beeswax in my recipes, I opted to skip it here just in case.
Nipple Cream Instructions
First, you’ll want to infuse the herbs into the olive oil. This helps maintain their beneficial properties in the balm without leaving residue or grittiness. You can do this in three ways:
- Solar infusion– If you have the time, you can let the oils infuse in the sun. Here’s the method, but in short, use 1/4 cup each of chamomile and calendula flowers, 2 tablespoons marshmallow root, and 1 cup olive oil in a pint size or larger mason jar. Leave this in the sun and shake daily to infuse. Note that this only works well in warm weather.
- Time Infusion-Similar to the solar infusion but without the sun. Place the same ratios of herbs and oil in a jar and shake daily for 2-4 weeks.
- Heat infusion– The best method for when you’re low on time! Place the same ratios (1/4 cup each of chamomile and calendula flowers, 2 tablespoons marshmallow root, and 1 cup olive oil) in a double boiler. Heat over low heat for 2-3 hours, until the oil takes on the scent of the herbs and changes color slightly.
No matter which method you use, at the end of the process, carefully strain out the herbs and keep the finished oil. I do this with a metal strainer lined with cheesecloth. This makes extra infused oil, but you can use the extra for lotion or other recipes.
If you want to make just enough for one batch of DIY nipple cream, then use the following ratios:
- 1/3 cup olive oil
- 1 Tablespoon each chamomile and calendula flowers
- 2 teaspoons marshmallow root
How to Use Nipple Cream – I liked to use this immediately after a nursing session. Gently apply it to the nipples and areola as needed to prevent soreness.
Comments
Post a Comment